Western Blotting
Learn what Western blotting is, how the technique works, the standard procedure, common applications and how to interpret Western blot results.

Western blotting is a laboratory technique used to identify a specific protein within a mixture of proteins. The method combines gel electrophoresis, membrane transfer and antibody-based detection to show whether a target protein is present, its approximate molecular weight and, under controlled conditions, its relative abundance.
The original protein-transfer method was described by Towbin, Staehelin and Gordon in 1979. The term Western blotting was subsequently used by W. Neal Burnette in a 1981 publication describing antibody-based detection of transferred proteins.
The original protein-transfer method was described by Towbin, Staehelin and Gordon in 1979. The term Western blotting was subsequently used by W. Neal Burnette in a 1981 publication describing antibody-based detection of transferred proteins.
Tags
Western blotting
What is western blotting
Western blotting technique
Western blotting protocol
Western blotting procedure
What is Western blotting?
Western blotting, also called immunoblotting, is a protein-analysis technique in which proteins are:
Extracted from a biological sample.
Separated according to molecular size.
Transferred from a gel to a membrane.
Detected using antibodies that recognize a particular target.
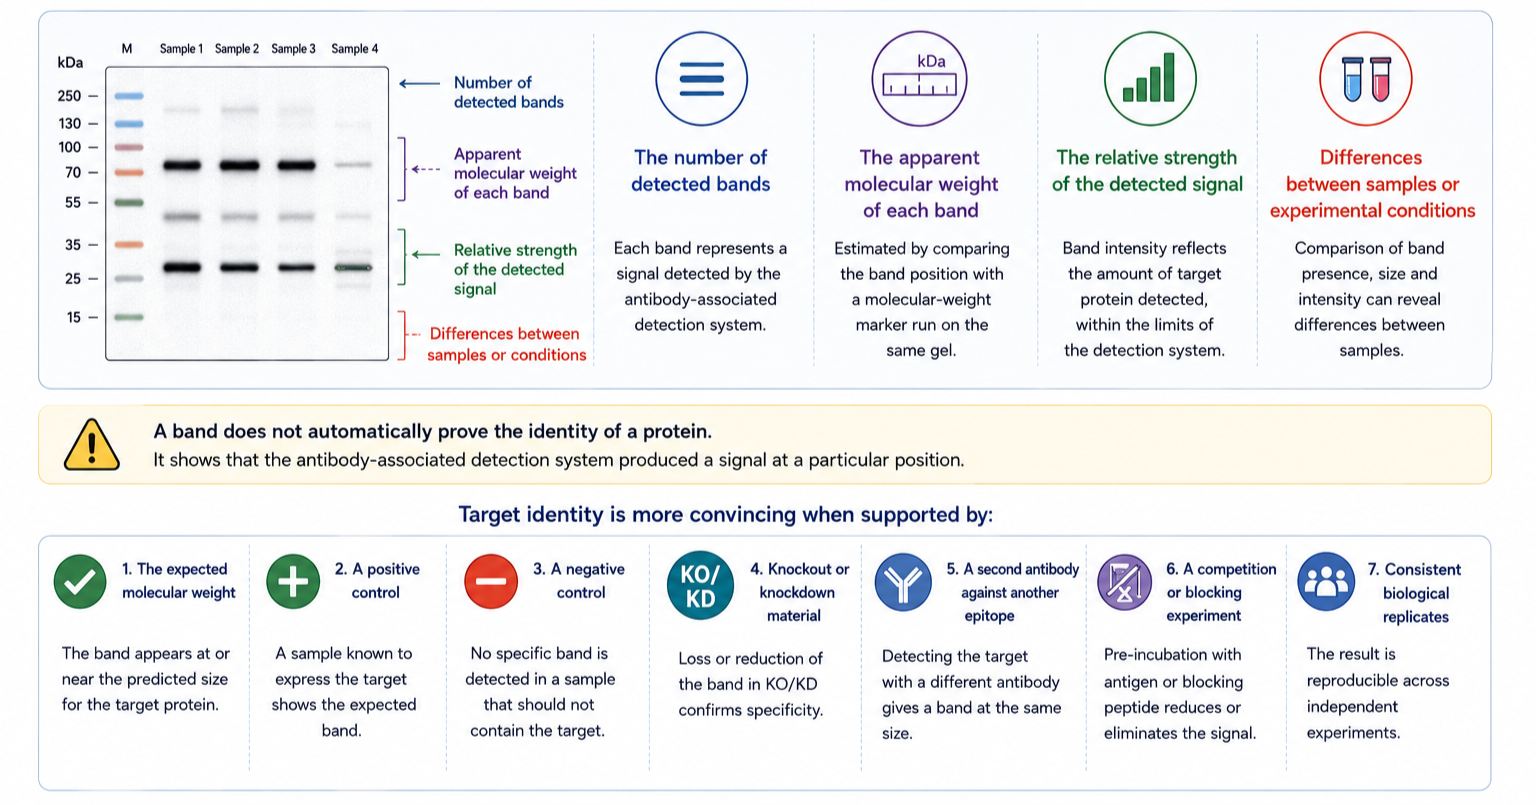
The result is an image containing one or more bands. Each band represents antibody-associated signal at a particular position on the membrane.
Western blotting can provide qualitative information about the presence of a protein and relative quantitative information when sample loading, transfer, detection and image analysis are properly controlled.
How does Western blotting work?
The Western blotting technique works through three main principles.
1. Proteins are separated by electrophoresis
Proteins from the sample are commonly denatured and separated using sodium dodecyl sulfate-polyacrylamide gel electrophoresis, or SDS-PAGE.
SDS helps give proteins a broadly similar charge-to-mass relationship. During electrophoresis, smaller proteins generally move through the gel more rapidly than larger proteins.
A protein molecular-weight marker is run beside the samples to help estimate the apparent size of detected proteins.
2. Proteins are transferred to a membrane
After electrophoresis, the separated proteins are moved from the gel onto a membrane, normally nitrocellulose or polyvinylidene difluoride, commonly abbreviated as PVDF.
The transfer preserves the protein-separation pattern while making the proteins accessible for antibody detection. Transfer quality can be affected by protein size, gel composition, membrane selection, transfer time and transfer conditions.
3. The target protein is detected with antibodies
The membrane is first blocked to reduce nonspecific antibody binding.
A primary antibody binds to the target protein. A labelled secondary antibody can then bind to the primary antibody and produce a detectable signal.
Depending on the detection system, the signal may be:
Chemiluminescent
Fluorescent
Colorimetric
Direct detection using a labelled primary antibody is also possible, although indirect detection using primary and secondary antibodies is widely used.
Simplified Western blotting protocol
The following is an overview rather than a product-specific experimental protocol.
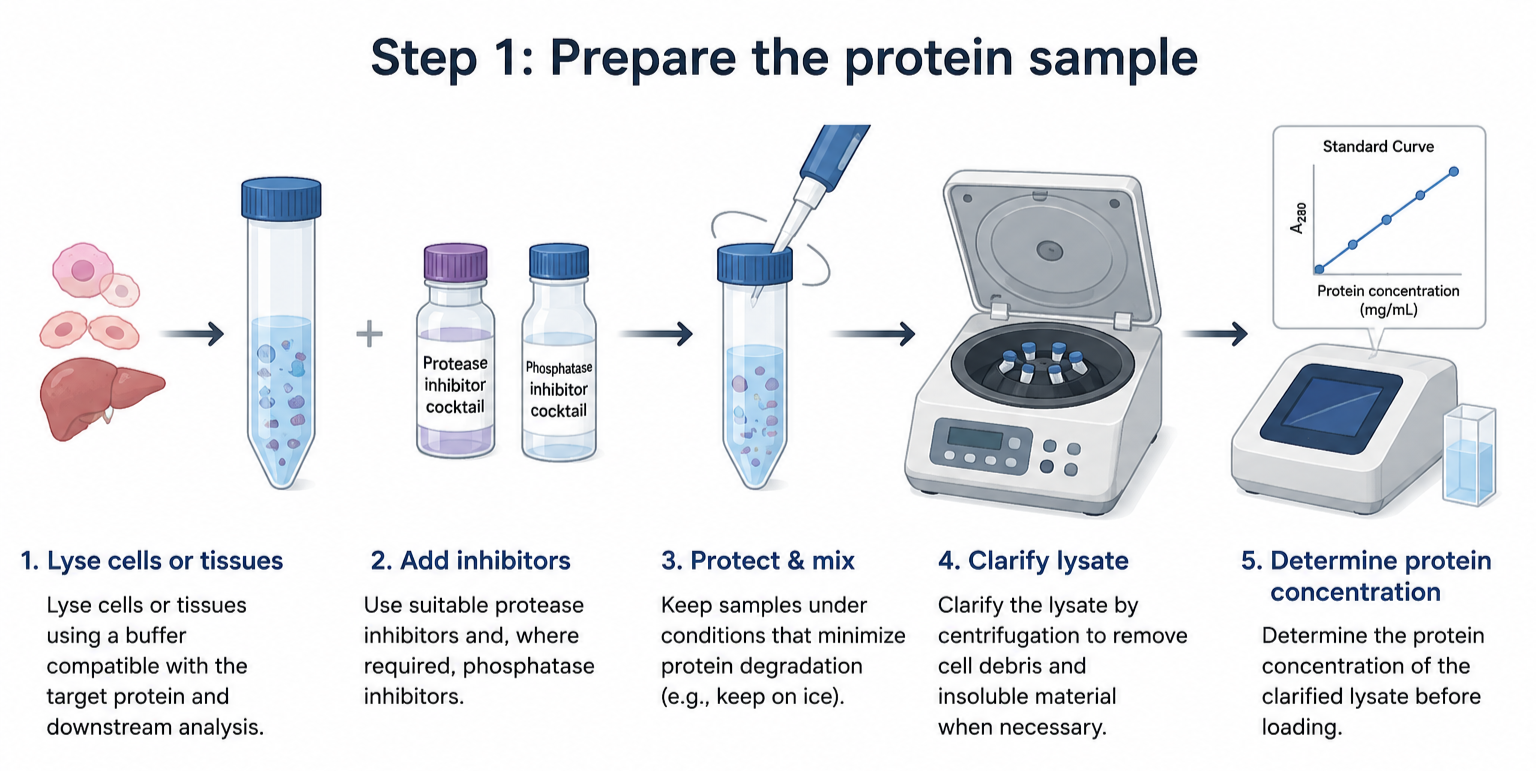
Step 1: Prepare the protein sample
Lyse cells or tissues using a buffer compatible with the target protein and downstream analysis.
Use suitable protease inhibitors and, where required, phosphatase inhibitors. Keep samples under conditions that minimize protein degradation.
Clarify the lysate when necessary and determine the protein concentration before loading.
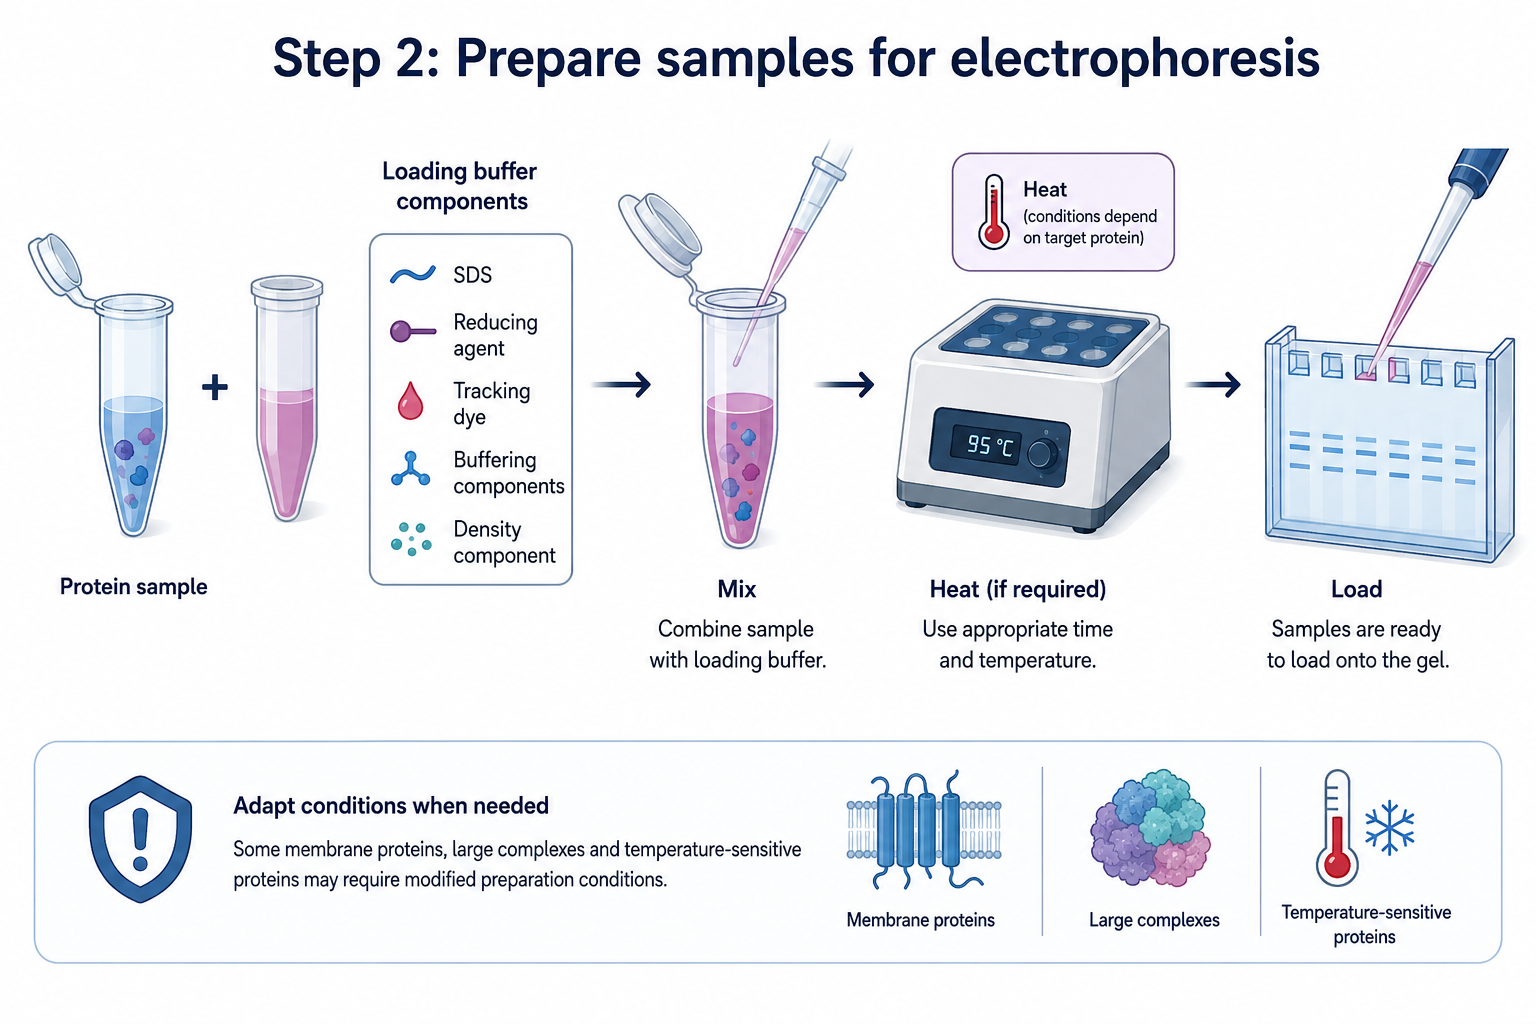
Step 2: Prepare samples for electrophoresis
Mix the protein samples with an appropriate loading buffer.
For reducing and denaturing analysis, the buffer normally contains:
SDS
A reducing agent
Tracking dye
Buffering components
A density component that helps samples settle into the wells
Heat treatment may be used, but the correct conditions depend on the target protein. Some membrane proteins, large complexes and temperature-sensitive targets may require modified preparation conditions
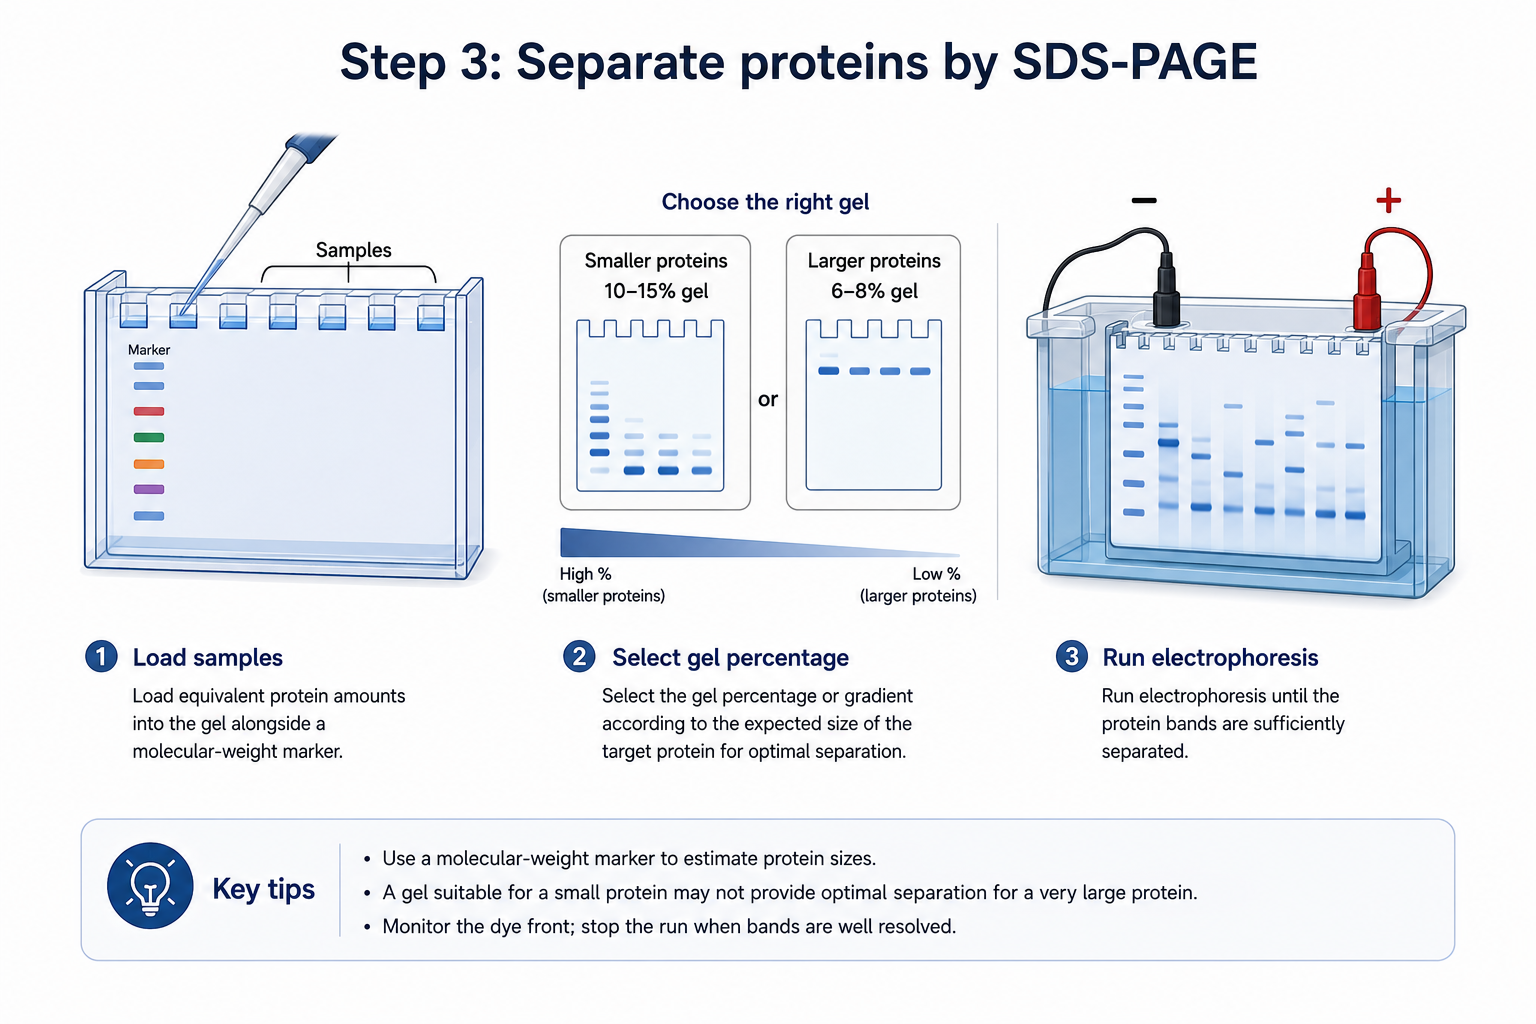
Step 3: Separate proteins by SDS-PAGE
Load equivalent protein amounts into the gel alongside a molecular-weight marker.
Select the gel percentage or gradient according to the expected size of the target protein. A gel suitable for a small protein may not provide optimal separation for a very large protein.
Run electrophoresis until the protein bands are sufficiently separated.
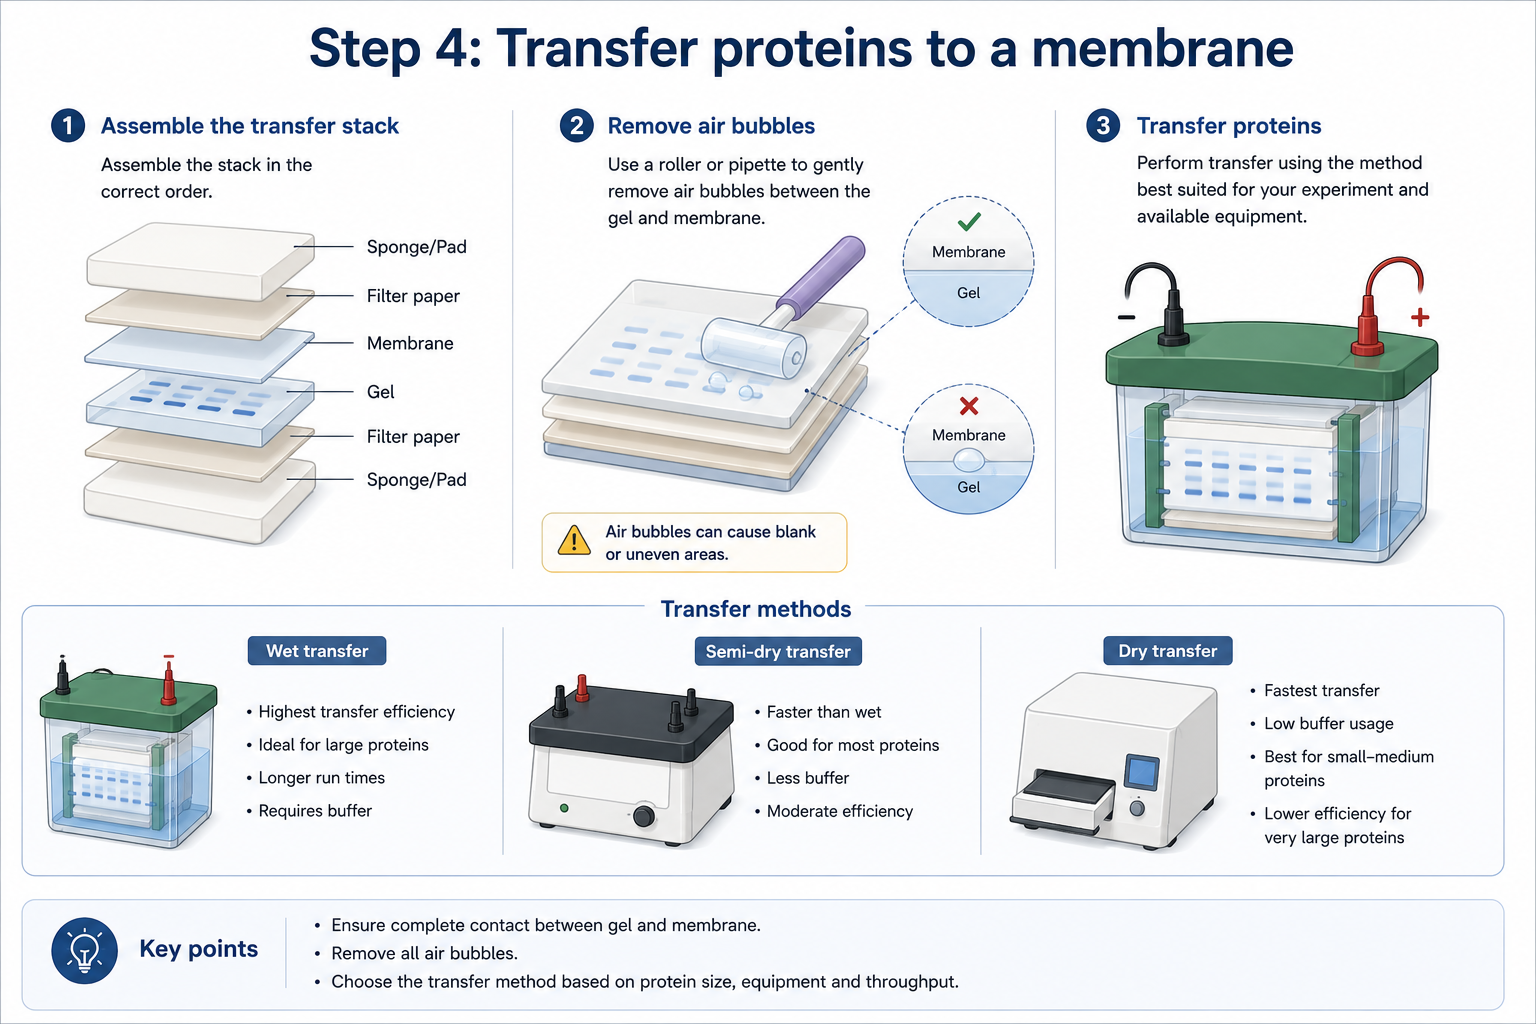
Step 4: Transfer proteins to a membrane
Assemble the transfer stack carefully and remove trapped air bubbles between the gel and membrane.
Air bubbles can prevent contact between the gel and membrane, producing blank or uneven areas.
Transfer may be conducted using wet, semi-dry or dry systems. The appropriate method depends on the available equipment, protein sizes and required throughput.
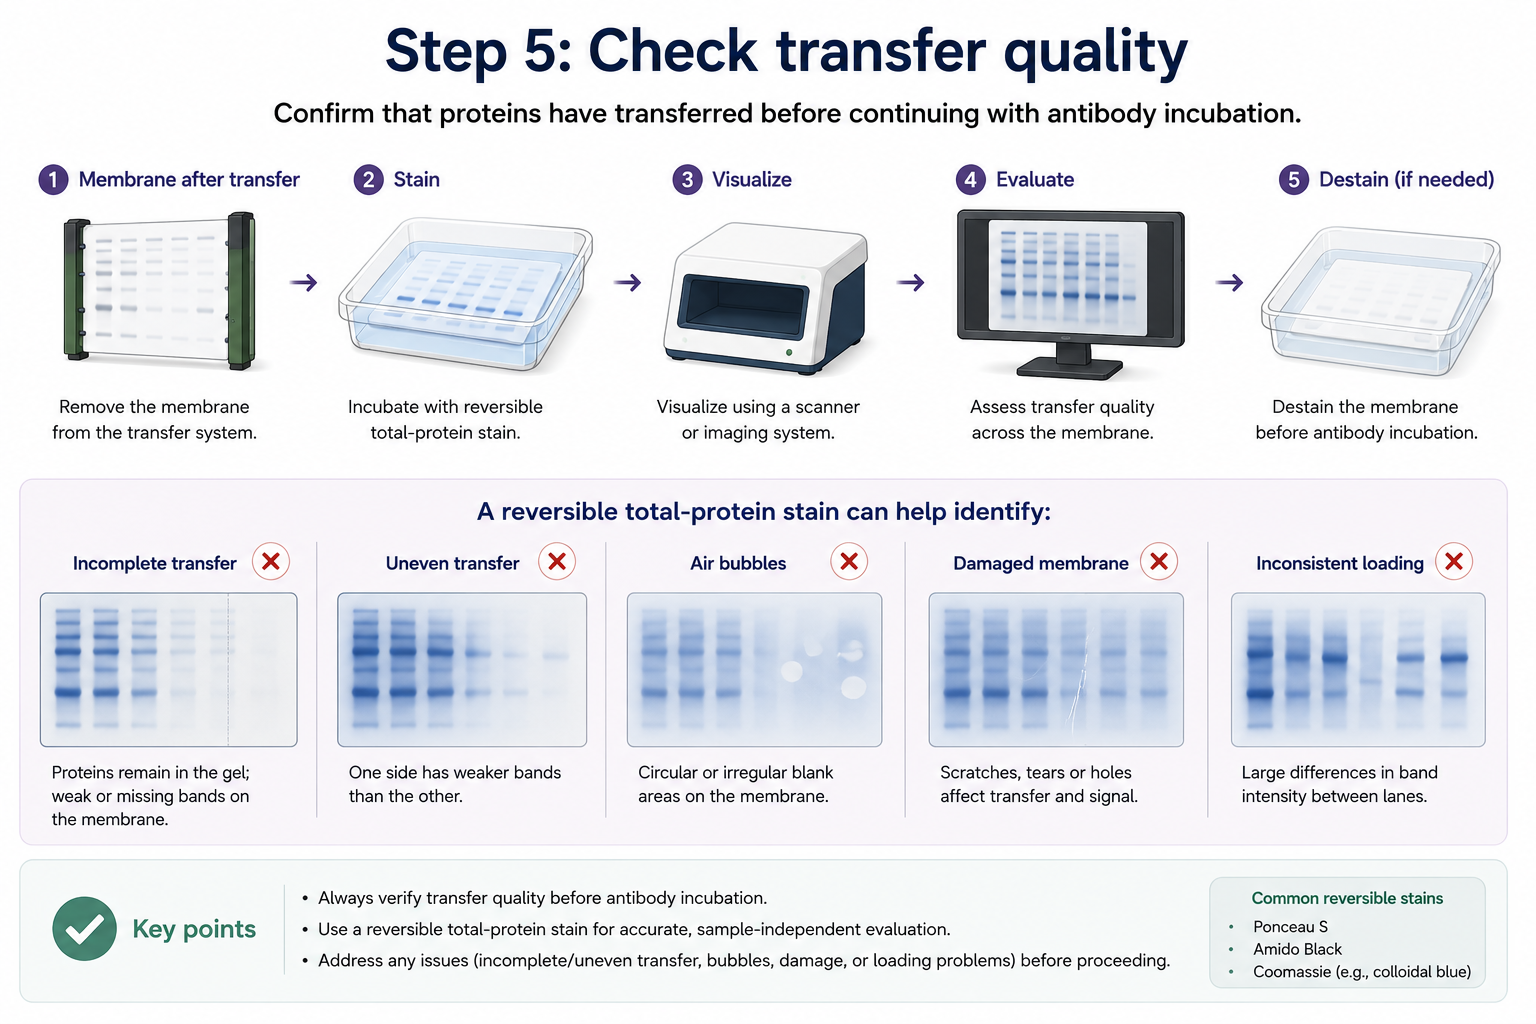
Step 5: Check transfer quality
Confirm that proteins have transferred before continuing with antibody incubation.
A reversible total-protein stain can help identify:
Incomplete transfer
Uneven transfer
Air bubbles
Damaged membrane areas
Inconsistent sample loading
Step 6: Block the membrane
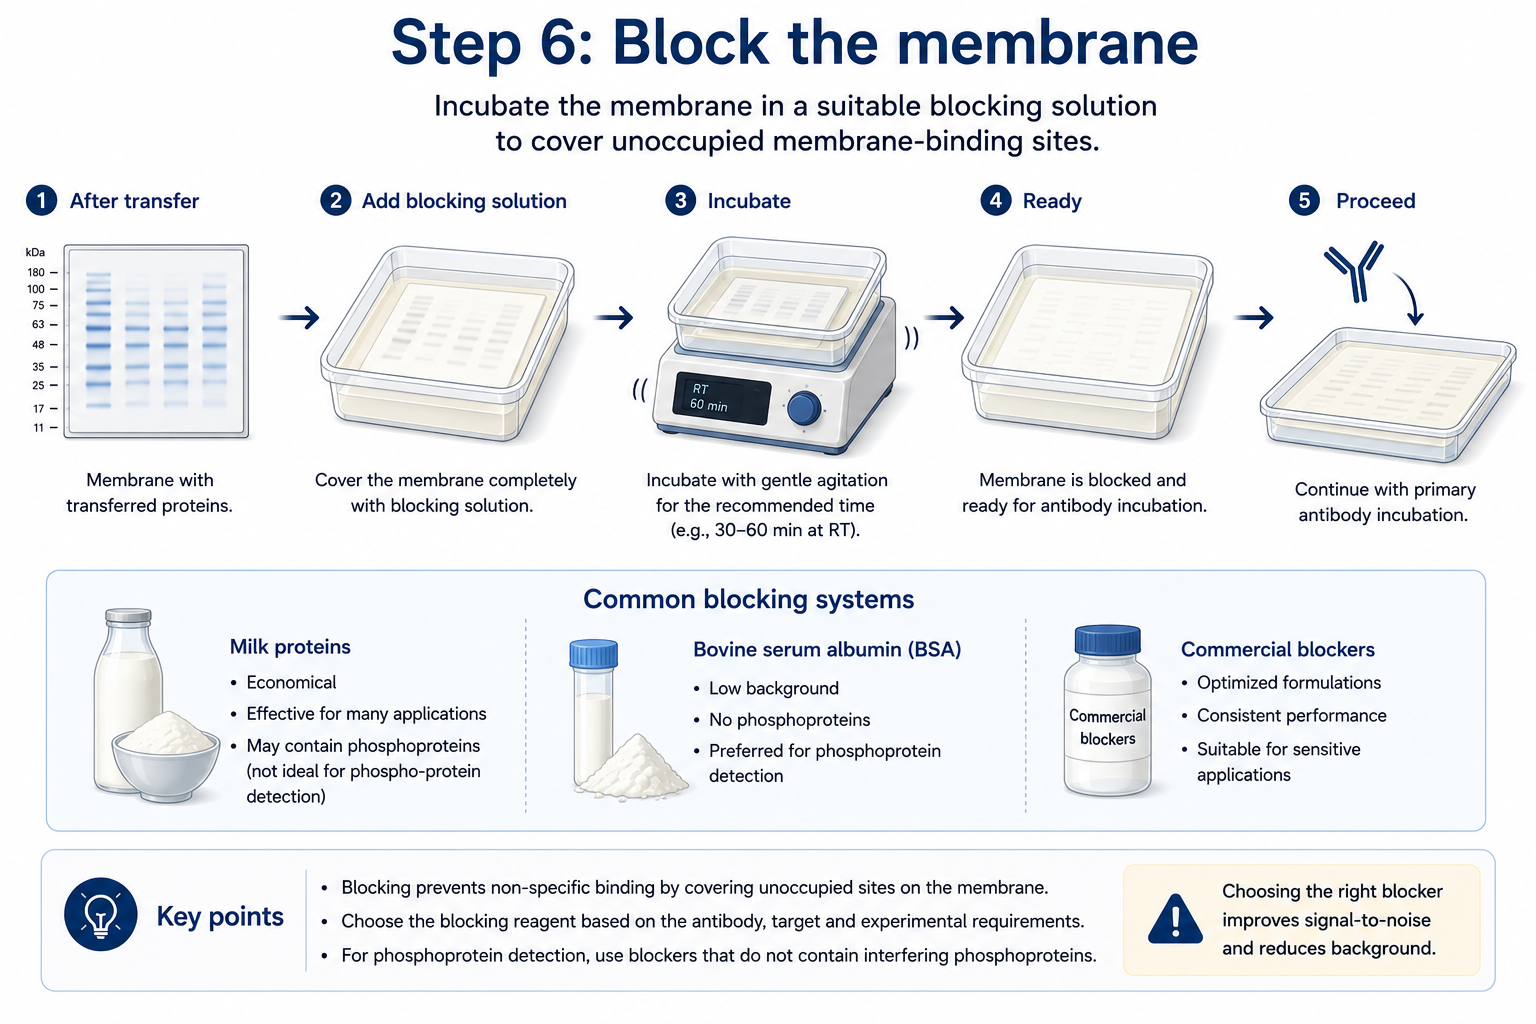
Incubate the membrane in a suitable blocking solution to cover unoccupied membrane-binding sites.
Common blocking systems use milk proteins, bovine serum albumin or commercially prepared blockers. The appropriate blocker depends on the antibody and target. For example, some phosphoprotein experiments may require a blocker that does not introduce interfering phosphoproteins.
Step 7: Incubate with the primary antibody
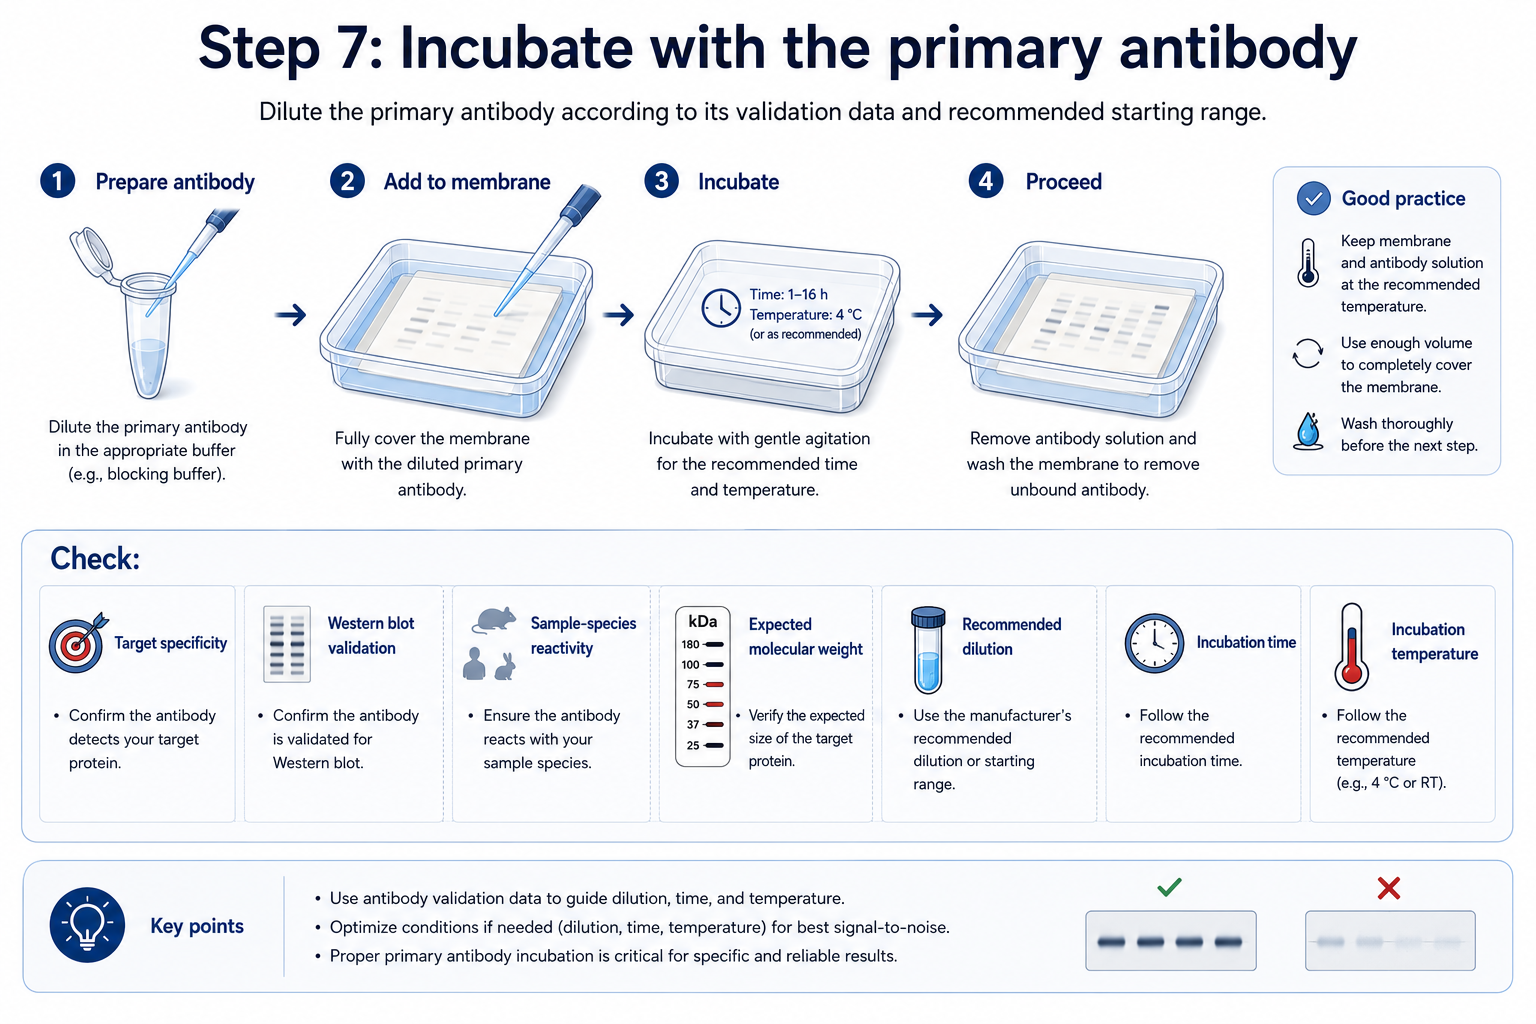
Dilute the primary antibody according to its validation data and recommended starting range.
Check:
Target specificity
Western blot validation
Sample-species reactivity
Expected molecular weight
Recommended dilution
Incubation time
Incubation temperature
Wash the membrane sufficiently after primary-antibody incubation to remove unbound antibody.
Step 8: Incubate with the secondary antibody
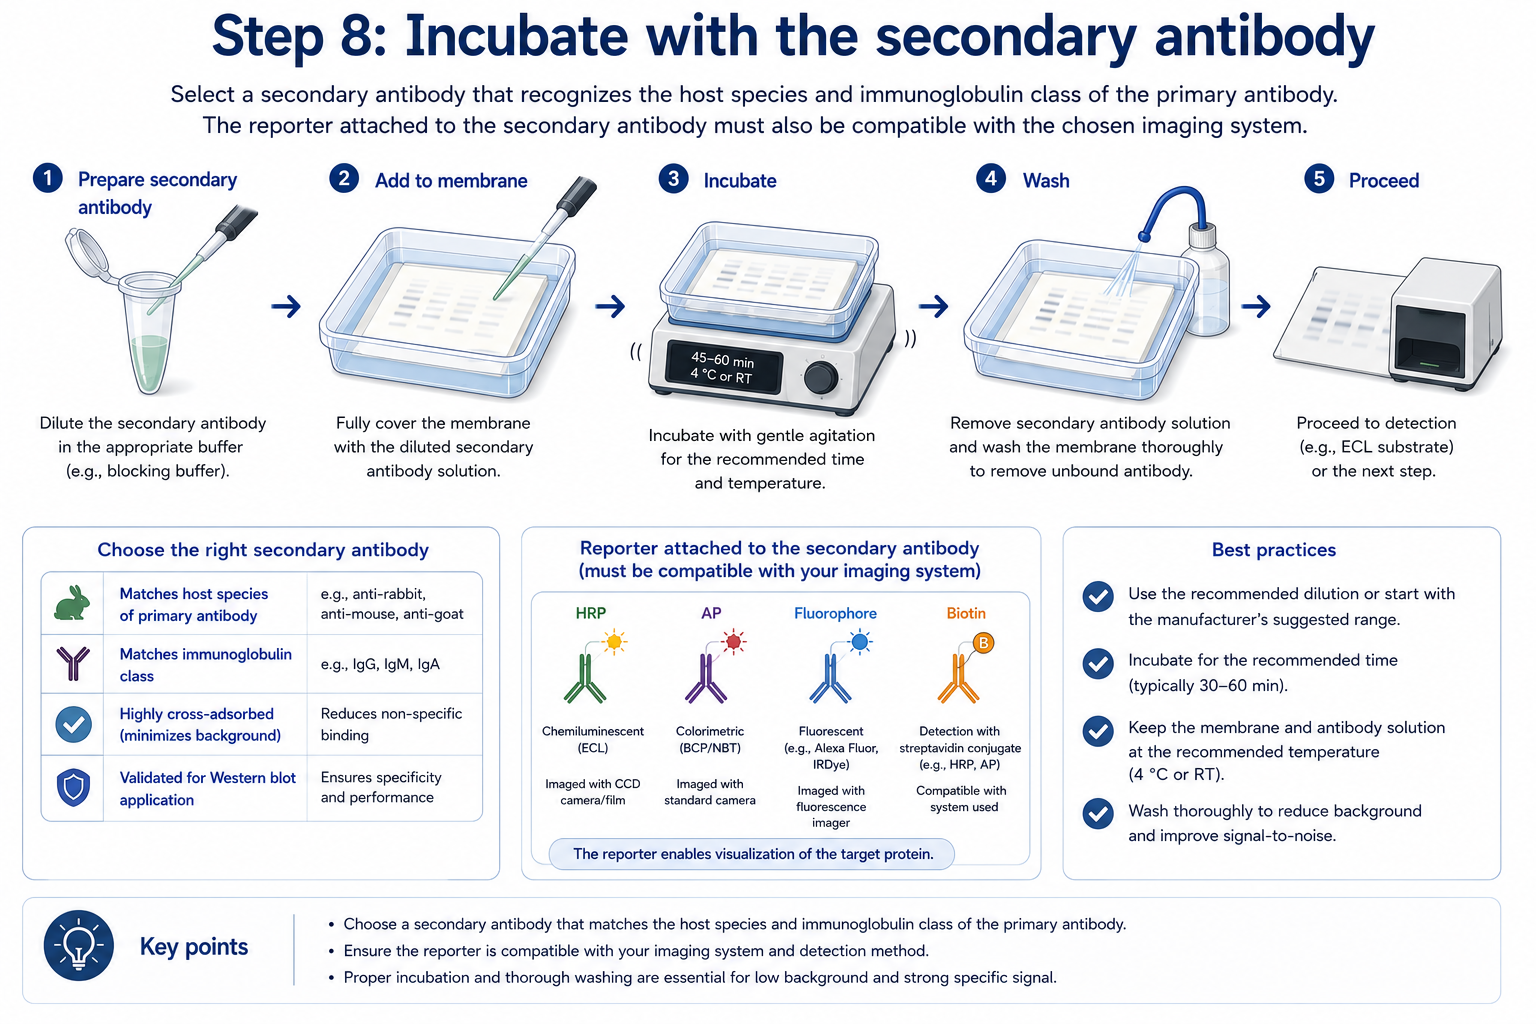
Select a secondary antibody that recognizes the host species and immunoglobulin class of the primary antibody.
The reporter attached to the secondary antibody must also be compatible with the chosen imaging system.
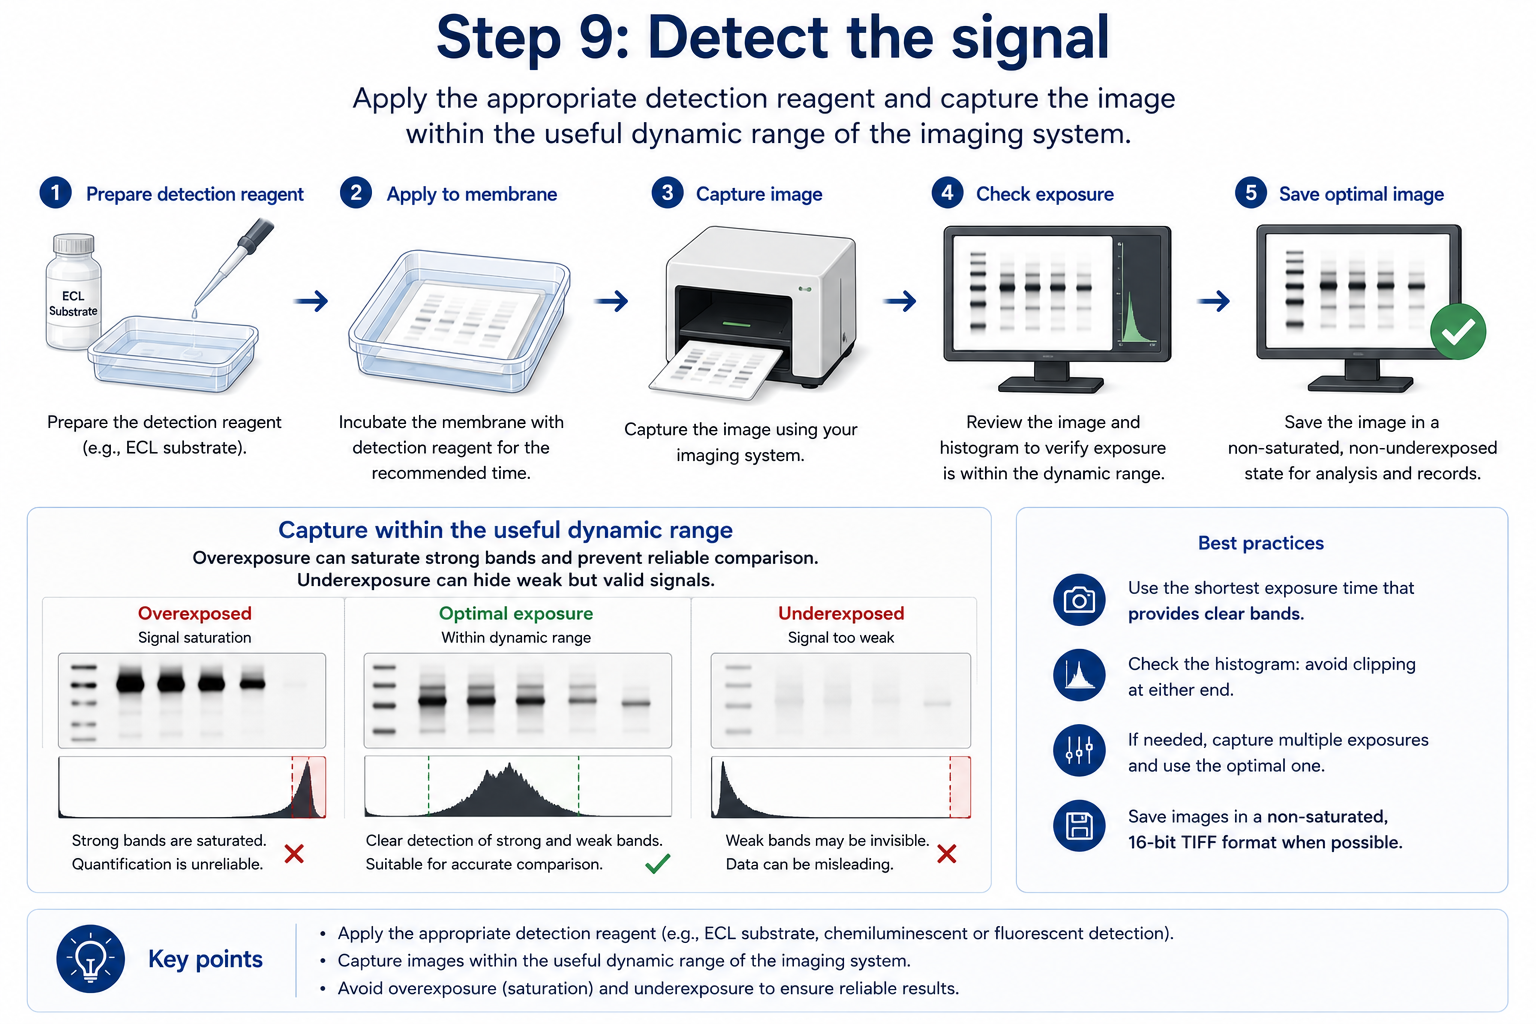
Step 9: Detect the signal
Apply the appropriate detection reagent and capture the image within the useful dynamic range of the imaging system.
Overexposure can saturate strong bands and prevent reliable comparison. Underexposure can hide weak but valid signals.
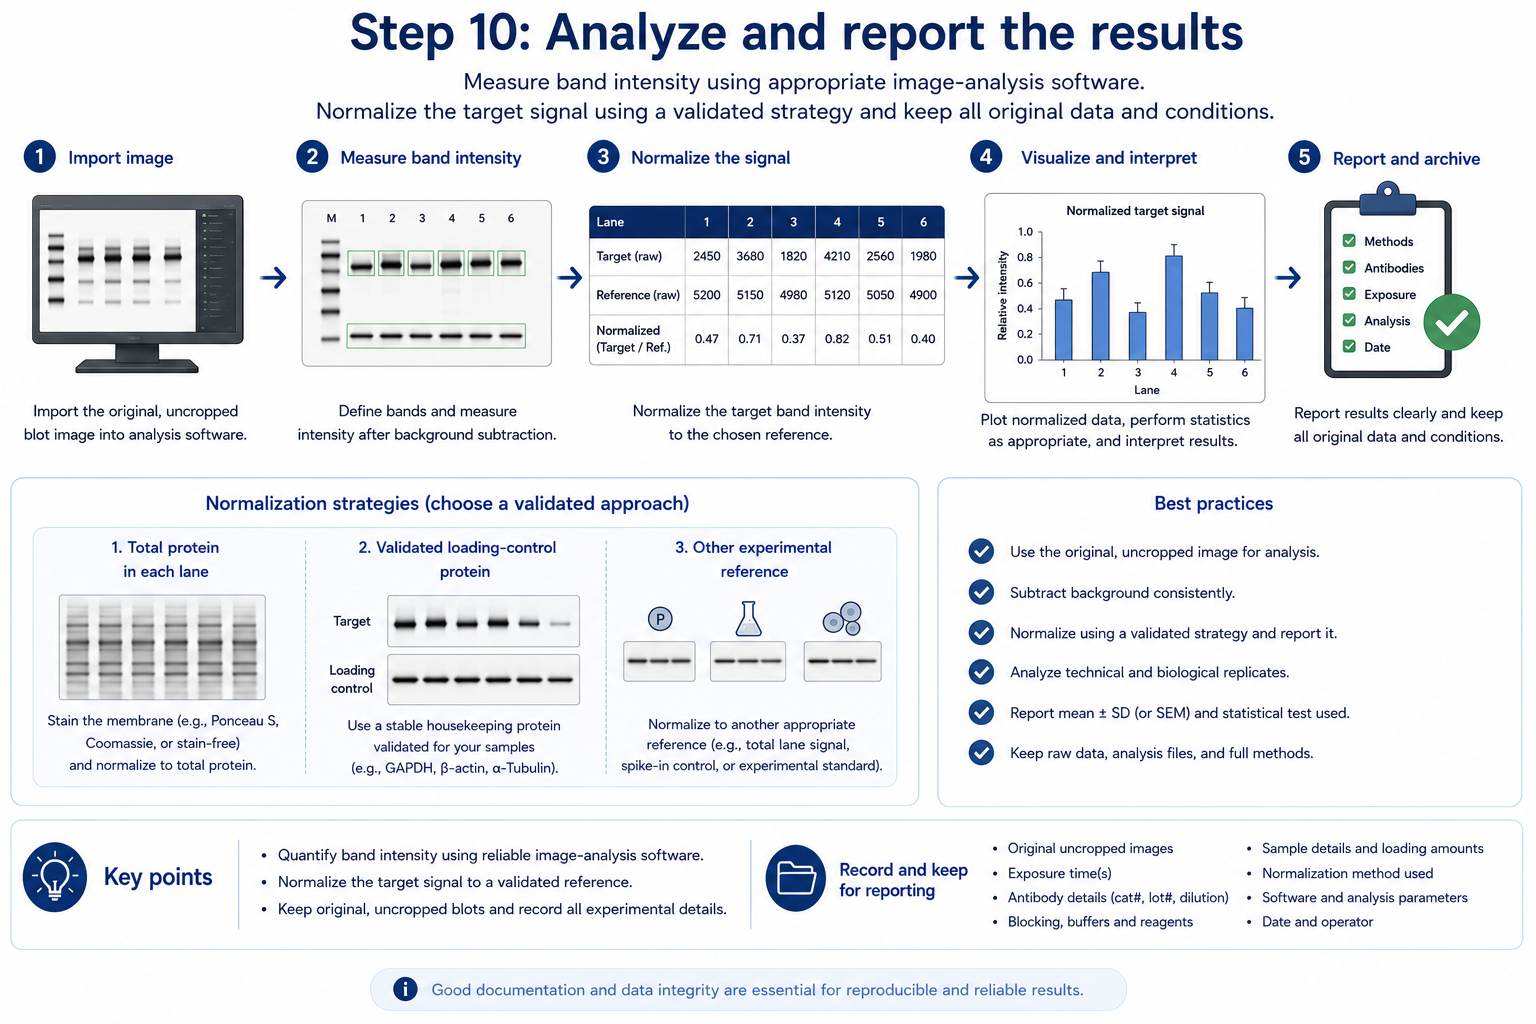
Step 10: Analyze and report the results
Measure band intensity using appropriate image-analysis software.
Normalize the target signal using a validated strategy, such as:
Total protein in each lane
A validated loading-control protein
Another experimental reference appropriate to the study
Keep the original, uncropped blot images and record all experimental conditions.
How to interpret Western blotting results?
Frequently asked questions
What is Western blotting?+
Western blotting is an antibody-based laboratory technique used to detect a selected protein after proteins have been separated by electrophoresis and transferred to a membrane.
How does Western blotting work?+
Proteins are separated according to molecular size, transferred to a membrane and exposed to antibodies that recognize the target protein. A chemiluminescent, fluorescent or colorimetric system is then used to visualize the antibody-associated signal.
What is Western blotting used for?+
Western blotting is used to detect proteins, estimate their apparent molecular weight, compare relative protein abundance and study protein processing or modifications.
What does a Western blot show?+
A Western blot shows bands representing detected antibody-associated signals. Their positions indicate apparent molecular size, while their intensities can provide relative abundance information under controlled conditions.
Is Western blotting the same as a Western blot?+
Write Western blotting usually describes the technique or process. A Western blot commonly refers to the resulting membrane or image, although the expressions are frequently used interchangeably.
Is a Western blot a test?+
It can be described as a laboratory test or analytical method, but its exact meaning depends on the application. Research Western blotting should not automatically be interpreted as a validated clinical diagnostic test.
How do you interpret Western blotting results?+
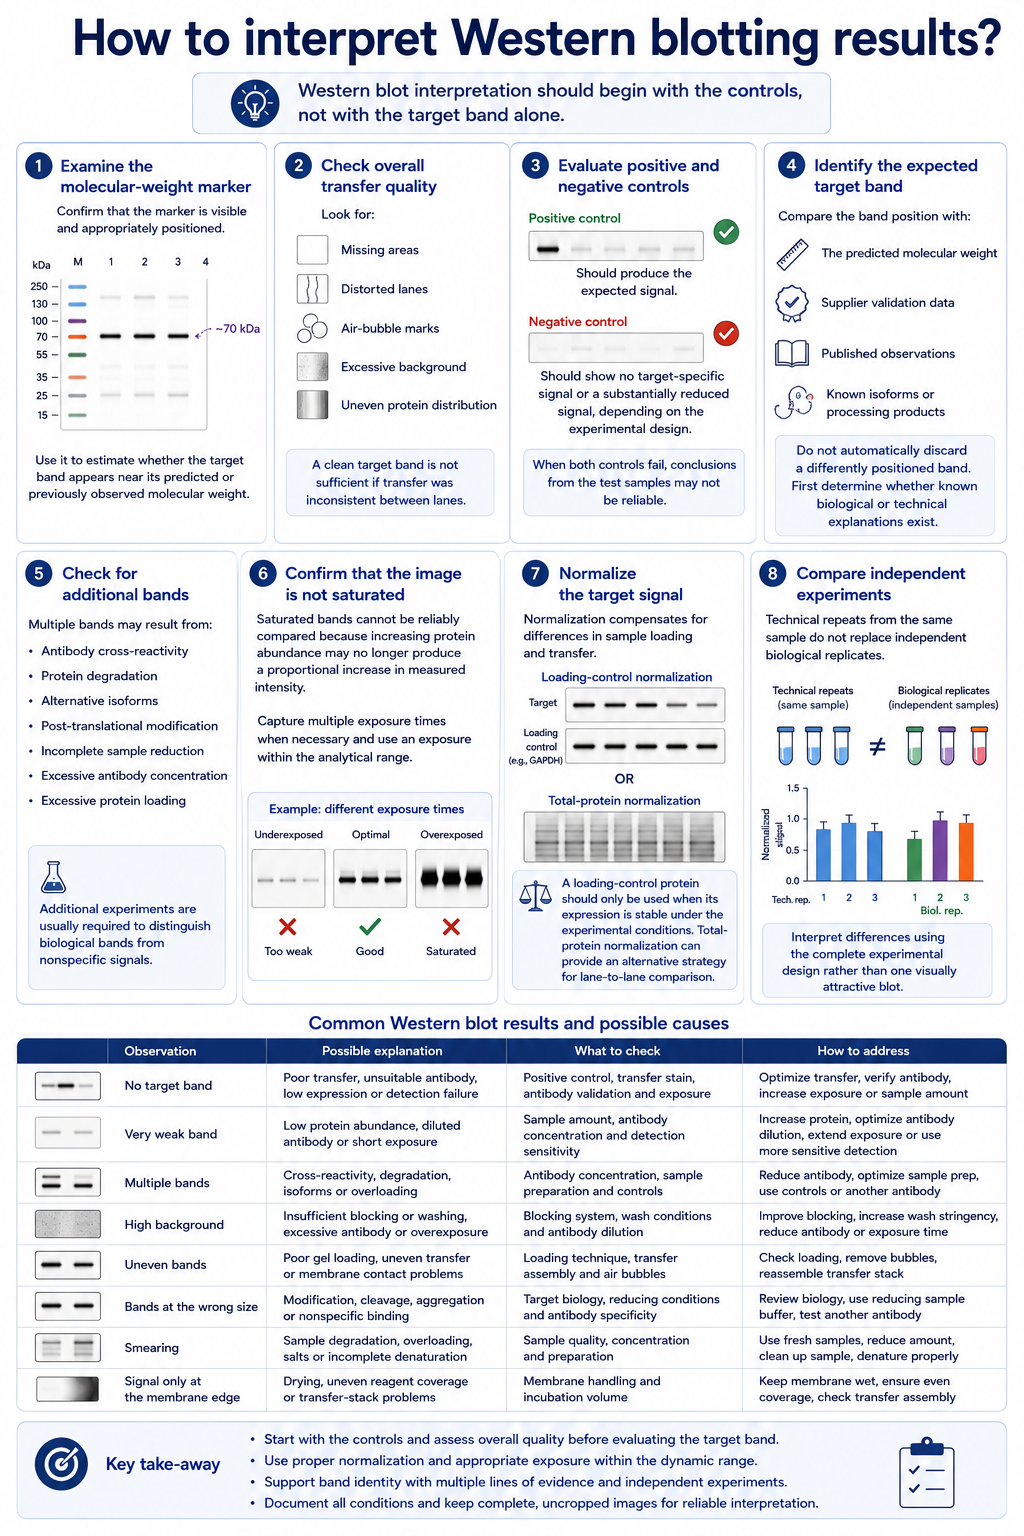
Start by checking the marker, transfer quality, positive and negative controls, expected band size, background and signal saturation. Normalize the target signal and compare results across appropriate biological replicates.
Why are there multiple bands in a Western blot?+
Multiple bands can result from isoforms, protein processing, degradation, nonspecific antibody binding, excessive sample loading or unsuitable antibody conditions. Controls are required to determine which explanation is most likely.
“Western blotting combines protein separation, membrane transfer and antibody-based detection to identify a selected protein within a complex sample. Reliable results depend on more than simply producing a visible band. Researchers must consider antibody specificity, sample preparation, transfer quality, expected protein size, exposure range, controls and normalization before drawing conclusions. A carefully designed Western blotting procedure can provide valuable information about protein presence, apparent molecular weight and relative abundance. However, each stage of the experiment must be validated for the target, sample and detection system.”